


How to Properly Torque Drill Inserts
It is the smallest component in the assembly, yet it bears the responsibility of holding back thousands of pounds of cutting force. The insert screw is often the most overlooked variable in indexable drilling. When an insert fails catastrophically, the blame is usually placed on the carbide grade or the speeds and feeds. However, AccurateCut diagnostics reveal that a significant percentage of premature failures are actually caused by improper clamping.
Torquing a drill insert is not simply about “tightening it until it stops.” It is a precise engineering procedure that ensures the screw creates enough axial tension to hold the insert rigid without deforming the drill body.
This guide outlines the physics of clamping and the strict protocol required to properly torque drill inserts, ensuring process security and protecting your expensive drill bodies.
Why “Hand Tight” is a Myth
In many shops, the standard procedure for changing inserts involves a generic Allen key and the operator’s “feel.” This is a recipe for inconsistency.
The Physics of the Screw
A screw functions like a spring. To generate clamping force, the screw must be stretched within its elastic limit.
- Under-Torquing: If the screw is not stretched enough, it acts like a loose spring. The insert will micro-move during the cut (chatter), leading to poor surface finish and eventual fracture.
- Over-Torquing: If stretched beyond its yield strength, the screw permanently deforms. Worse, it can crush the insert or strip the threads inside the drill body pocket.
The Operator Variable
“Hand tight” is subjective. An operator at 8:00 AM might apply 1.5 Nm of torque, while the same operator at 4:00 PM, fatigued from a long shift, might apply only 0.9 Nm. This variability kills tool life consistency. To maintain predictable production, you must remove the human variable using calibrated tools.
The Hidden Danger: Hydraulic Lock
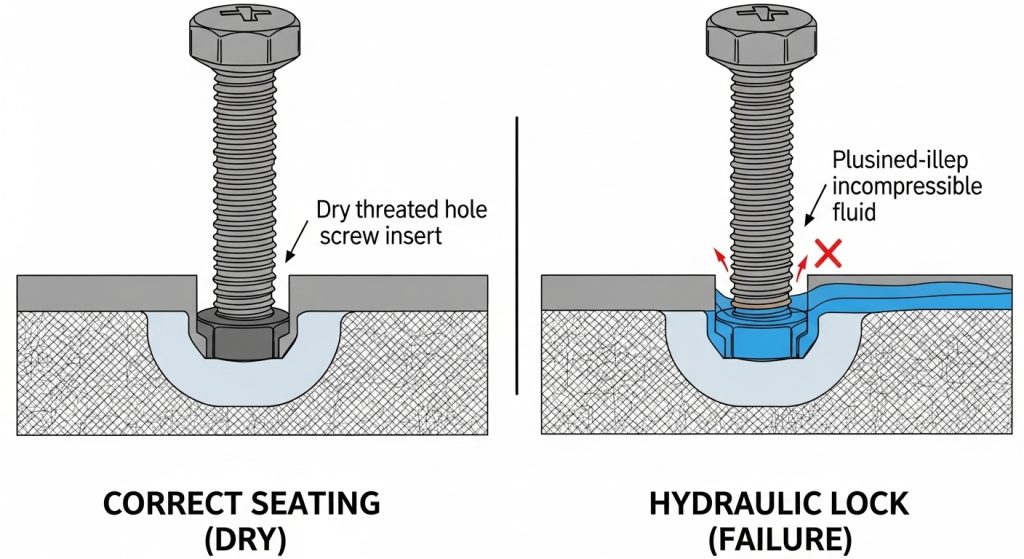
One of the most common reasons for “mysterious” insert looseness—even after using a torque wrench—is hydraulic lock. This phenomenon occurs when the threaded hole in the drill body is partially filled with coolant or oil.
The Mechanism
Liquids are incompressible. As you drive the screw down, it acts like a piston. If coolant is trapped at the bottom of the hole, the screw compresses the fluid and stops.
- The False Positive: Your torque wrench will “click,” indicating the correct resistance has been reached.
- The Reality: The resistance came from the fluid pressure, not the screw head seating against the insert. The insert remains loose, and as soon as the drill enters the cut, the insert shifts and breaks.
Step-by-Step Torquing Protocol
To ensure 100% rigidity and prevent failure, follow this strict replacement protocol every time an index is performed.
1. Remove and Inspect
Remove the old screw. Don’t just look at the head; check the threads. If the threads look “stretched” or narrowed near the middle, the screw has exceeded its yield point and must be discarded. This is also a critical moment to review what to check before buying drill inserts to ensure your replacement screws and inserts match the body’s specific requirements.
2. Clean the Pocket (Critical)
Use an air blast to clean the empty pocket. Even a single chip of metal dust trapped behind the new insert will prevent it from seating flat, causing stress issues similar to those seen in severe chip packing. A raised insert will crack instantly under cutting pressure.
3. Dry the Threads
Direct the air blast into the threaded hole to evacuate any oil or coolant. This eliminates the risk of hydraulic lock.
4. Seat the Insert
Place the new insert into the pocket. Press it firmly against the pocket walls with your thumb before inserting the screw. This ensures it is properly aligned and not pivoting on a corner.
5. Apply Torque
Using a preset torque driver (matching the manufacturer’s spec, typically 0.6Nm to 4.0Nm depending on screw size), tighten the screw in one smooth motion until the driver clicks. Do not “double click” or jerk the tool.
Choosing the Right Tools
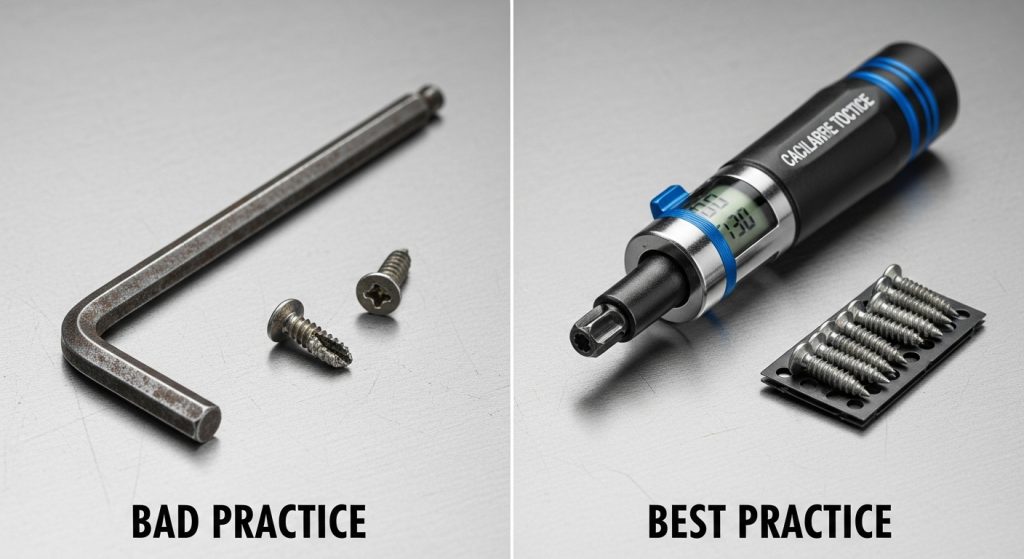
The days of using L-keys and flag drivers for production drilling are over. The tolerances of modern high-feed drills require precision.
The Torque Driver
Every drill station should be equipped with a preset torque driver. These tools prevent over-tightening, which preserves the life of the drill body. If you strip the threads in the body, you ruin the tool. Investing in a $100 torque driver saves you from replacing a $600 drill body. For more on protecting your assets, refer to our industrial drill maintenance buying guide.
The Screw as a Consumable
Operators often treat screws as permanent fixtures. They are not. They are consumables that fatigue over time.
AccurateCut Rule of Thumb: Replace the insert screw every 10 insert changes. It is the cheapest insurance policy you can buy. Always ensure you have areliable drill insert supplierto keep fresh, high-quality screws in stock.
Troubleshooting Screw Issues
If you are following the protocol but still encountering issues, check these common variables.
Screw Won’t Loosen
This is often caused by thermal expansion or “cold welding” from micro-vibrations.
- The Fix: Use a high-quality “Torx Plus” bit, which has a larger contact area than standard Torx, to break it free. Applying a tiny amount of high-heat anti-seize (if permitted by the manufacturer) can prevent this.
Insert Movement / Chatter
If the insert is properly torqued but still moves, the pocket itself may be damaged. If previous operators over-torqued the screws, they may have “bell-mouthed” the threaded hole, allowing the screw to wobble.
- The Fix: Inspect the pocket for deformation. If the pocket is compromised, the drill body must be replaced. When selecting a replacement, knowing how to compare indexable drill brands ensures you get a body with superior pocket hardness.
Conclusion
Proper torque is not just a suggestion; it is a requirement for process security. By treating the clamping process with the same respect as the programming process, you eliminate a major variable in tool failure. Clean the pocket, dry the threads, and trust the torque wrench.
At AccurateCut, we engineer our drill bodies and inserts to work as a unified system. Treating that connection correctly ensures you get every minute of tool life you paid for.
Frequently Asked Questions (FAQ)
How often should I replace insert screws?
We recommend replacing the screw after every 10th insert index, or sooner if the screw shows visible wear or thread distortion. A fresh screw ensures optimal elasticity and clamping force.
Can I use Moly grease on insert screws?
Generally, no, unless the manufacturer specifies “wet torque.” Grease reduces friction, which can cause you to inadvertently over-stretch the screw even at the correct torque setting. Always torque dry unless told otherwise.
What happens if I over-torque the screw?
Over-torquing stretches the screw beyond its elastic limit, making it weak and brittle. It also damages the female threads in the drill body, which can eventually render the entire drill body useless.
Why does my insert loosen during cutting?
If the torque was correct, loosening is often caused by vibration (chatter) or hydraulic lock during installation. Ensure the setup is rigid and the screw hole was dry before installation.